Routers have a different way of dealing with VPN based on their firmware, model, and making. In case you wish to add a VPN to your Netgear router, then you can do that in two ways.
You can either turn your router into a VPN server or you can set up a VPN client on Netgear. Here, we are going to provide you with the best virtual private network solutions for your Netgear 7000, 8000, and 6200.
Nighthawk enables you to use a VPN so you can easily access your own internet service when you are not home. In case you don't know why you should use a VPN, then you must not forget that it is useful at times when you go to a geographical location that does not support internet services that you are using at home.
Moreover, you can use a VPN router if you have a device that you wish to connect to a VPN server only and not to your normal connection.
Below are the steps that you need to follow to set up VPN on your Netgear router.
Step 1: Please ensure that your device is connected to the Wi-Fi network of your router.
Step 2: Use your internet browser to access the official website of Netgear.
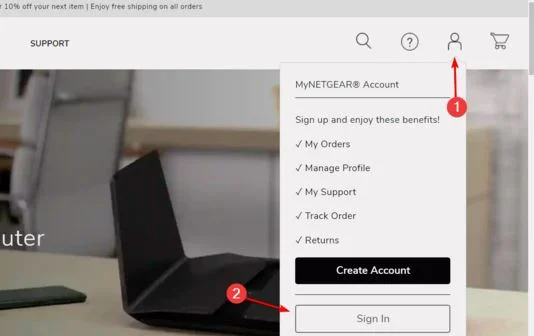
Step 3: Go to the upper-right corner of the window and hover your cursor over the login icon. After that, select the Sign In option.
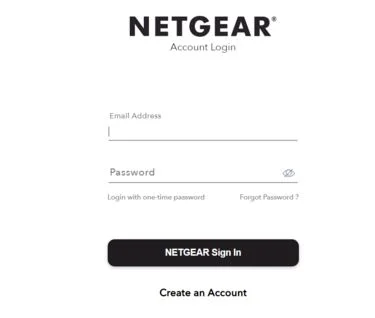
Step 4: After that, you are required to enter your email address and password. Then, hit the Netgear Sign In button.
Step 5: Open Settings.
Step 6: After that, go to the option of Advanced Settings and then select VPN service.
Step 7: Then, check the option of "Enable VPN service".
Step 8: Once you reach the option of "Clients will use this VPN connection to access, select "All sites on the Internet and Home network.
Step 9: Select Apply.
Step 10: After that, choose for non-Windows, Windows, or smartphone for downloading the OpenVPN config files.
Step 11: Download your open VPN client and set it up on the device you wish to use for accessing your network.
Step 12: Copy the OpenVPN file from Netgear.
Step 13: Now, you will be able to access your home network from Open VPN.
So, these are all the steps that you need to follow to set up a VPN for your Netgear router. When you do it at home, you are not required to spend any money as the Netgear firmware supports VPN server mode.
You are just required to use an open VPN client that is open source and free. Once you connect to your home network, you will be able to access your files, and share videos and photos over a VPN. It will be more like sitting in front of your PC.
Sadly, Netgear firmware does not support VPN client mode anymore. However, the silver lining is that it enables you to install custom firmware like OpenWRT, DD-WRT, and Tomato.
Here, we are talking about open-source and free firmware that will give you a chance to install a VPN client directly on your router. After installing the firmware, you just need to install a premium VPN subscription plan. After that, download the OpenVPN configuration files and then add them to your router.

What Do I Need for a Mesh Network?
2 Jul, 2026
How to Setup VPN for Netgear Nighthawk Router?
3 Jul, 2026Copyright © 2026 Router Support 247 | all right reserved.
DISCLAIMER : Router Support 247 is an independent Technical Support Provider. We are not affiliated to any 3rd party brand unless specified. Call vendor for direct Support.


Top Searches in Netgear Support