A VPN connection is all you need when you want to carry out office work securely, but in the attempt to set up VPN connection on Tenda routers, there are a range of sequential steps to be executed. This quick guide is here with the complete process to provide insights as to how you can Set up VPN connection on Tenda routers in a simple and easy way.
_1698399071.webp)
Step 1 - Initiating the process to set up VPN connection on Tenda routers first access the setup page of your router. For this, you have to launch an updated browser and add the Tenda router’s setup address in the address bar.
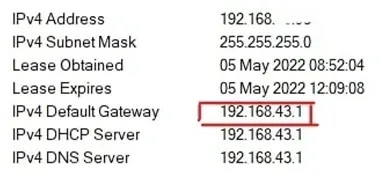
Note 1: In a normal scenario the Tenda page address is http://192.168.1.1 but you can also refer to the user manual to obtain the exact “Default Gateway Address”.
Note 2: Another striking aspect is that you can opt to set the network settings in your computer so that the IP address is directly extracted in case of having an Ethernet connection.
Step 2 - Now click on the “Advanced” option under the “Internet Connection Setup” section.
Step 3 - When you are exploring options under the “Advanced” section just make sure that “Internet Connection Setup” is chosen.
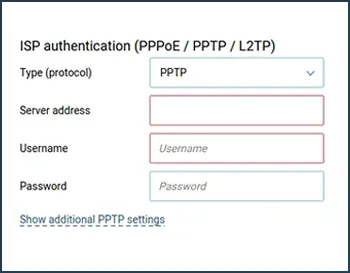
Step 4 - Here, open the drop-down menu shown next to the “Internet Connection Type” option and continue selecting the “PPTP/L2TP” option to take forward the process to set up VPN connection on Tenda routers.
Note: It is worth taking note of that after executing Step 4 the IP address will change but your connection will remain unencrypted for want of enforcement of IPSec standard.
Step 5 - Now in the text field carrying the heading “PPTP/L2TP Server Address” punch in the IP Address of the VPN server you wish to connect to.
Step 6 - Just continue entering the login credentials of your VPN that you first got registered at the time of availing of the VPN service.
Step 7 - At this stage just click on the drop-down menu labeled “Address Mode” and from the given set of options just select the “Dynamic” option going forward.
Step 8 - Continuing with the process to set up VPN connection on Tenda routers just click the “OK” button at the bottom of the page.
Step 9 - Now from the list available on the left side click the “DNS Settings” option.
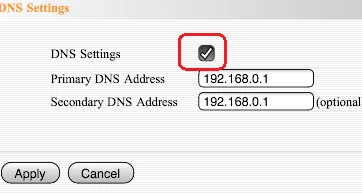
Step 10 - Continue clicking on the checkbox labeled “Enable Manual DNS Assignment”.
Step 11 - Here at this moment you have to enter the DNS server address in the “Primary DNS Server” and the “Alternate DNS Server” fields. You can enter the Public Google DNS or any other open DNS address.
Step 12 - Finally, click on the “OK” button followed by giving a restart to your router. So, with the entire process getting completed just continue enjoying the ensuing benefits of this secured VPN connection.
How To Setup VPN Connection On Tenda Routers
21 Jul, 2026
How to Set up a Tenda Access Point as a Repeater?
21 Jul, 2026
How Do I Setup Tenda Nova MW6?
21 Jul, 2026
Tenda Router Not Detecting Internet Connection?
20 Jul, 2026Copyright © 2026 Router Support 247 | all right reserved.
DISCLAIMER : Router Support 247 is an independent Technical Support Provider. We are not affiliated to any 3rd party brand unless specified. Call vendor for direct Support.
Top Searches in Tenda Support